Kayak Construction, Day Six, completion - 31 October 2021
This is written on 4 November and the kayak is resting in the garage. I am trying to get the Blogger layout commands to put the photo to the side of this text, but with severely limited joy so far.
Reconstructing, on Day Three, we had a separate deck (top) and hull (bottom) that fit, that had some edge glue to hold the panels together, and a lot of copper wires holding everything together. Although the kayak has enough strength to be able to move the hull parts about, it must be done carefully.

On Day Four, we expanded the fiberglass work. We used a thickened epoxy mix to fillet (two l's rather than one) the hull pieces. This fillet is to fully set the deck and hull shapes that the prior tacking had begun, and the fillets give structural strength to the halves of the kayak. To provide a continuous fillet, all the wires must be removed. We are talking hundreds, probablly 200 or more. There remain a handful in the bow and stern of the hull to retain the proper shape because there is notable twist and stress in the plywood. Eventually, the few remaining wires will be clipped and sanded flush (fortunately, while copper is strong enough to hold the stresses, it is also soft enough to work with sandpaper). To do the filleting, I clipped the wires at the deck-hull joint, laid the halves of the boat side-by-side with the (to be) interiors facing up, and clipped the remaining wires. This gave easy access to the interior for stem-to-stern fillets. I prepared the filleting epoxy mixture and used the clipped end of a sandwich bag to apply long fillets that were then smoothed to a gentle curve. The curves were pretty flat in the bottom and got sharper (smaller radii) toward the bow and stern. I also applied fillets to the bulkheads, preparing them to be waterproof. We left this to set for a bit and started taping the seams with 3-inch fiberglass to reinforce the strength of the joints. We put extra layers of glass in the bow and stern, and then put a sealing coat of epoxy on the inside of the lower hull.

To start Day Five, I glued one of the hatch fixtures in place. This goes on the inside to hold the previously cut hatch covers aligned with the deck and to create a waterproof assembly. I had to shape the hatchh assemblies to fit the slope of the deck at the sides; I also needed to adjust the fillets to seal the waterproof chambers. I taped the underside of the deck seams and put a sealing coat on the bottom, then it looks like I glassed the underside of the deck and rejoined the halves. Somewhere in the day, more sanding cleaned up the puzzle joints, removing the surface epoxy and leaving the joints. Late in the day, I started work on the Kokopelli accents by the cockpit. Inlay was not really possible due to the complex outline of the figures; to be honest, inlay is the way to go for simpler figures such as circles. I put a stripe of epoxy on the deck to give the Kokopelli fitures something to stick to (yes, I also put epoxy on the underside of the Kokopelli figures). Then I laid down a heavy coating of epoxy, taking care to fill in the figures as much as I could.
This worked well. The green tape that you see is simply holding the halves together. Again.

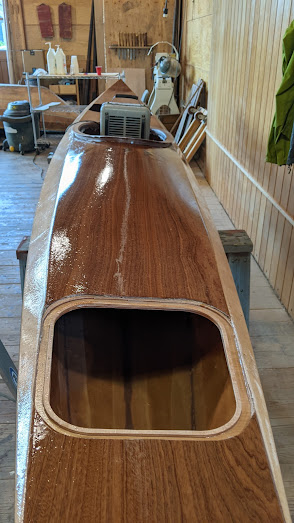
I came in on Day Six to cut the extra fiberglass from the remainder of the cockpit and hatch openings and trimmed up the edges. Today was challenging for a couple reasons. I applied a top surface of fiberglass to the deck and later spread a fill-coat to smooth out the weave (make it less visible). This will create a problem later in the day because of the curing delay in the cool, Autumn temps -- therefore the heater that you see in the photo. I also filleted the joint between the hull and the deck. Around the cockpit, I applied 3-inch tape and epoxy, then the rest of the seam got 1-inch tape and epoxy. The 3-inch tape is very hard to handle when working in the limited access through the hatch holes, so the 1-inch tape was a welcome relief. While I waited for the epoxy to cure, I helped apply glass and epoxy to the outside hull of several other boats. Finally, at about 6pm, it was declared that the epoxy was ready for travel.
I already had a roof rack on the car, so I added some foam padding to protect the kayak. We threw some straps over the top and padded them with old towels and plastic wrapped around the straps. As a general rule, shiny plastic will not adhere to the epoxy, therefore the straps and towels were kept unglued to the car and straps. We took the ferry home and arrived without incident. Well, except for the deer that tried to cross the road as we were leaving Port Townsend - able to stop in plenty of time to avoid entanglement. The canoe is now resting the garage and I am acquiring tools and materials to complete the work.


No comments:
Post a Comment